Saturday, January 31, 2009

I Want a Gun!

A scanning gun, that is. Yesterday, Fiance and I decided to tackle one of our gift registries. We're currently debating on whether to have two registries or three; we have such a small guest list that three seems really unnecessary. At any rate, we knew that no matter how many places we registered at, Bed, Bath and Beyond was going to be on the list. (If you're interested the other one or two will be from the following list: Macy's, Crate and Barrel, or Target.)


Anyway, Fiance was super excited about the prospect of running through the store with a scanning gun. As we drove to Bed, Bath and Beyond, he joked about registering for the most ridiculous items whenever I turned my back -- like an Elvis clock or a duck shaped gravy boat. Sadly, when we got to the store and headed for their gift registry desk, we were not handed a gun, but instead were made to fill out forms and were handed three huge binders of china and crystal stemware. Not only is this not a fun way to shop (at least not for me!), but we weren't even planning on registering for fine china or crystal anything. For one, I'm a klutz and broke three glasses in about a month this past summer. On top of that, these items are way over the price range of gifts we wanted to register for.
The worst part was receiving the tough sale from their registry assistant. We did decline the fine china and crystal, but in a very cowardly way. "I'd like to see some of the every day plates out on the floor before making my decision," I told him after he pressured me into registering for the set I'd mistakenly admitted "looked nice."

I thought that the registry assistant would then turn over the gun to us and let us loose. Nope. Turns out, he was going to hold onto the gun and walk us through each section and give us a sales pitch about everything. Not only that, but he tried to talk us into registering for the more expensive item every time. Now, I understand it's his job to boost sales and all that, but I found it extremely annoying. He even registered us for a saucepan that cost $150! For one saucepan! He tried to pressure us into registering for items that Fiance and I firmly told him we did not need because we already had. And then he tried to get us to register for the most random items -- like corkscrews (we have four sets already, three of them Christmas gifts to us this year!), paper towel holders (if I wanted that, I would've bought one for myself by now), and other gadgetry that would never see the light of day after being pushed to the back of a cabinet in our kitchen.

Now, neither Fiance and I are that great at saying "no" to people. So we did let him add a few extra items/more expensive items to our registry. We knew, though, that as soon as we got home, we'd log on to the website and delete them from our list. We also knew that we were going to add some other items because we simply didn't want to mention the possibility of getting a waffle iron in front of him lest he launch into yet another sales pitch.

On our way home, we stopped in at Target to pick up a few essentials. Well, actually, we went in hoping to find a microwave on sale (can you believe that we've lasted six months without a microwave now?), but the one we wanted was sold out. We checked out their registry department which is better than Bed, Bath and Beyond's in that they don't follow you around the store giving you a sale pitch. However, they also do not give you a scanning gun. Instead, you're supposed to load up your cart with items you want and then bring them down to the registry kiosk and scan them all yourself there. That doesn't seem very efficient or fun to me! We want a registry gun that we can operate ourselves!

Does anyone know if Macy's or Crate and Barrel operate by giving the wedding couple a gun and letting them go at it? Or do they all operate more like Bed, Bath and Beyond? I promised Fiance a day of running through a store tagging items and I do not want to let him down . . .

Thursday, January 29, 2009

Beautiful/Artistic Wedding Shot


photo by F.C. Wong

How cool is this shot? I think on F.C. Wong's old blog, he also had a similar picture that caught a couple's first dance through a wine glass. I would do just about anything for a shot like this at our wedding. Unfortunately, our plastic stemware probably won't be able to create the same type of photo...

Congratulations! You Have Booked Your Ceremony Site...

Now please wait 4 to 6 weeks for your permit. Seriously?

Well, as you may have guessed from the permit requirement, we booked one of the lovely outdoor/park sites! But which ceremony site did we decide on? We ultimately decided on the Cypress Grove at Crissy Field. Why? Well, a number of reasons, actually...


I'll be honest and say our number one choice was the Shakespeare Garden. It had such a quaint, cute and romantic feel to it. We loved how it was secluded and had a built in walkway. I loved the trees lining the walkway and the fact that it referenced the great William Shakespeare. We thought the brick was gorgeous and really did fit into our wedding theme.

HOWEVER, we also realized that unless we were 100% committed to providing our guests with transportation, it would be asking too much of our friends since these sites aren't very close to each other. We didn't want all of our out of town guests to be forced to drive all over a strange city (we both hate city driving) or take expensive taxis to our venues. We're not 100% sure whether we can provide transportation for our guests, though we would like to. Plus, Shakespeare Garden is very difficult to find. Even though it was our top choice, I can honestly say that I'm fine with not getting married there. Although we definitely would've picked Shakespeare Garden if it was located where Crissy Field was, we loved the sites at Crissy Field almost as much! It really was a tough call...

In the end, we decided that we did like all three Crissy Field sites. We just had to decide which one. Although we both loved the fact that the amphitheater had built in seating, it was the least favorite of the three. Since we were able to find a vendor who agreed to deliver, set-up, wait for the ceremony then breakdown the chairs all at a reasonable price, we decided to pay the few hundred dollars extra to have the ceremony where we really wanted it.

Personally, Cypress Grove and East Beach were a toss up for me. I loved the walkway at Cypress Grove but loved how open the space was at East Beach. I loved that Cypress Grove was beach adjacent but also loved that East Beach was right on the water while still being on concrete. The trees at Cypress Grove were gorgeous but East Beach was so accessible from the parking lot. So what pushed Cypress Grove over the edge?


When we first approached the grove and I pointed it out to Fiance, he became really excited and practically ripped the camera from my hands as he ran over to check it out. It was the only one of the three sites that really caught his attention. Even though he said he liked East Beach a lot too, it was pretty obvious that he had fallen in love with Cypress Grove.


Fiance often says that X doesn't matter, that it's my wedding, that if it was ever something that was really important to him, he would tell me. While I know that he does tell me whenever something is super important to him (example: I wasn't planning on wearing a veil, but this was one tradition Fiancee felt passionate about), I do not believe that it is "my" wedding. I can tell when things are important to him. Now, I know that when he says it doesn't matter, he means that he would be happy with any of the sites we had narrowed it down to. But that doesn't mean he wouldn't be happier with one particular choice. Since both Cypress Grove and East Beach had their pros and cons, I was truly torn between the two. So why not go with the one Fiance obviously adored?

There are a few logistical problems with Cypress Grove, but we can get into those at a later date. For the time being, I'm just happy that we have our site picked out! Reception venue: Check. Ceremony site: Check.

Now, I've been assured by the park ranger in charge of special event permits that our date is booked. I have now paid for the permit. We just have to wait for it to arrive in the mail now. We wait...4 to 6 weeks. Argh. Why does it take this long to type up a permit???

Wednesday, January 28, 2009

Ceremony Site Saga: Is it Possible to Have a Beach Wedding in San Francisco?

When we looked at ceremony venues, we stuck almost exclusively to parks and beaches. San Francisco has so many gorgeous parks in Golden Gate Park alone that we knew we could find somewhere beautiful to hold our ceremony. Fiance originally wanted us to get married on a beach in Santa Barbara, so when that didn't work out, I decided we would definitely make sure to have our ceremony outdoors because it was important to him. And, truth be told, I loved the idea of an outdoor wedding. Despite being Catholic and always assuming I would get married in a Catholic church, it no longer seemed that crucial. Besides, Fiance is not Catholic and we have lived together for two years now -- not usually the best starting point when you approach a Catholic priest. Besides, we're on a tight budget and parks are much cheaper than most other ceremony sites.

We visited what I felt like was a lot of sites, but I tire easily when forced to drive around the city. I seriously hate city driving, but Fiance has a stick shift which is no bueno when you're in a city plagued by so many hills! In reality we visited maybe 7 diferent sites, but 5 of them were all located in two places (there were three sites located at Crissy Field in the Presidio of San Francisco, and two were at Golden Gate Park). So in actuality, we only had to go to four different locations but that was more than enough for me. Ready for a tour of San Francisco Parks? Good, here we go (I've only included pictures of the sites we didn't nix immediately):

We first thought of Golden Gate Park and the beautiful parks within it. Fiance's first time at GGP wasn't that long ago. October, I think? He had been complaining that he had not done enough tourist things since moving out to California. Granted, we had done touristy things over the past couple of years whenever he visited over summer and winter breaks, but we hadn't done anything since making the big move post-law school. We studied like crazy for the bar exam (we both passed!) when we first moved out, but even though we had tons of time on our hands after the exam was over, we just didn't spend a lot of time in San Francisco. Anyway, he loved GGP, so it made sense to start there. Fun trivia fact: Did you know that GGP is larger than Central Park in New York? Also, if you visit GGP you absolutely MUST see the bison pen. I think it's rather amusing that there's a buffalo habitat in the middle of the park. Anyway...

We first googled "Golden Gate Park wedding ceremony" and quickly found a link to park permits. We then started googling each park name to see if the pictures looked like something we might consider.

1. First stop: The Shakespeare Garden in Golden Gate Park.


As you can see from the second picture, Shakespeare Garden is really secluded with its own gate. There's a built in brick walkway which is gorgeous and trees line the "aisle" -- very romantic! You can have the Shakespeare Bust open for a wedding, too. And, as a former English major, I loved the idea of getting married at a place named after such a famed author. When we decided to do a vintage themed wedding, this site seemed even more perfect. But, no site is "perfect." We knew that this site would require us to rent chairs and arrange for the delivery, set-up and breakdown. Plus, Golden Gate Park is not particularly accessible for guests who have never been to San Francisco. It's not BART accessible and is not particularly close to our reception site. And remember how I said it's secluded? The flip side to that is it is also hard to find.
2. We also checked out the Fuschia Garden at GGP, but (assuming we even found the right place) it just didn't seem appropriately set up for a wedding. We couldn't imagine an aisle, altar or seating for the guests. There was a small trail, but nothing really struck us as a wedding location. Moving on...

3. We were SO disappointed that we couldn't check out the Palace of the Fine Arts. Unfortunately, it's closed to the public until October 2009 for maintenance. Why couldn't they open it just a month or two earlier?! WHY?


See how pretty? How could anyone NOT want to get married here? And it's even better in person, even with construction fences covering it. And at $550 for two hours, it's a pretty good deal! But it was obviously not meant to be. Stupid maintenance/construction. Now, we did visit this site, but only after we picked our actual site because we wanted to see whether it would be possible to take wedding pictures here. So it doesn't really count, right?

4. Our next visits were actually indoor sites. We visited City Hall first. If you're not familiar with San Francisco's City Hall, you MUST visit the site or find some google images. That place is gorgeous. I thought about the site simply because I worked across the street from City Hall all summer in 2007 when I interned for the Attorney General's Office. It took some convincing to get Fiance to look at City Hall, but once I found him some pictures, he was sold.


Not your typical City Hall is it? The Rotunda is gorgeous. However, they no longer rent it out by the hour. We thought about having it on the Mayor's Balcony (it's on the second floor directly across from where the photographer was standing in the second photo) instead, but you run the risk of getting bumped from your location if the mayor decides to hold an event or a press conference or something. It is his balcony after all. Also, the balcony can only hold 20 or so seats which meant most of our guests would have to stand. Plus the additional set up fees for chairs was pretty highy. Aside from that, the venue rental was very expensive (okay, not that bad, but out of our price range). I still love City Hall though and would love to get some pictures descending the staircase there!

5. We did visit one church, but not a Catholic one. What church is accepting of sinners such as ourselves? The First Universalist Society of San Francisco came to mind. My little brother was actually baptized there (somehow in the ten years between me and my brother my mom decided she no longer wanted her children baptized Catholic). Unfortunately, it too ended up being out of our price range, at least for the site we wanted. The Sanctuary was beautiful, but probably too big for our 80 guests. It also happened to be about 3 times as much as we wanted to spend on a ceremony site. The Octagonal Chapel was within our budget, but we definitely preferred other sites (like the Shakespeare Garden). I highly recommend checking it out if it fits your budget, though. The event coordinator is fabulous!

6. Our last stop! The Crissy Field sites. We actually came across this option just by googling "outdoor wedding ceremony park san francisco". A number of articles and sites came up including a brochure from the National Parks Services about possible wedding sites North and South of the Golden Gate Bridge. We immediately eliminated everything North of the bridge (because then we would no longer be in San Francisco). We also nixed any place that prohibited special event use permits for summer months. In the end, Crissy Field seemed like the best bet. My first choice was the amphitheater because then we wouldn't have to deal with chair rentals and set up and all that.


This time, I was prepared with my camera! Can you believe it took me this long to remember? So you get to see me, Fiance, and Puppy! The site has gorgeous views of the Golden Gate Bridge, Palace of the Fine Arts (see #3 above) and Alcatraz. The downsides were the possibility of the grass being super muddy, the fact that guests would have to sit in their Sunday's best on concrete steps and the fact that it's a pretty crowded area (it's close to a cafe/hot dog stand). We both liked the site, though, and it shot up to the top of our list.

7. Also at Crissy Field was the East Beach. There isn't one particular location you can have your wedding ceremony at, but basically as long as you do not obstruct a common pathway (you leave enough space between your set up and the edge of the water or behind the chairs) you're good to go. Now, even though we'd originally talked very seriously about a beach wedding, I wasn't thrilled with the idea anymore. I'd already bought my dress (with a train) and I wanted to wear heels! We looked into a number of ideas such as putting down tiles or straw mats or a very heavy aisle runner, but I still wasn't thrilled about it unless we could get a wooden walkway and platform. Fiance really wanted to do it though, so I agreed to look at the beach. Turned out, right next to the sand, there was a perfect spot to set up a wedding ceremony:


A perfect compromise, don't you think? It's beach adjacent, and basically right on the ocean. We could have us and the bridal party on the steps and set up chairs on the area you saw in the second photo. The views of the Golden Gate Bridge and Alcatraz are absolutely perfect. Plus, it's super close to the parking lot which meant it was convenient for the guests. After visiting the rest of the East Beach and agreeing that none of the other sites were what we were looking for in a wedding ceremony site, we decided we were done. We just needed to make a choice as to which location we wanted. But wait! Didn't I say there were eight sites? Well, since we had Puppy with us and it was a beautiful, sunny day (can you believe these pictures were taken in January?) we went for a walk through the Presidio. And wouldn't you know it? We found another possible ceremony site!

8. As we were walking down the Golden Gate Promenade at Crissy Field, I pointed to a grove of trees and said to Fiance, "That's kind of a nice area." So we stopped, checked it out and took some pictures.


Like the other Crissy Field sites, there were gorgeous views (of the Golden Gate Bridge and Alcatraz, of course). The grove is also beach adjacent and there were multiple set up options. We could set up chairs in the grove itself, interspersing charis between the trees or on the beach, facing the grove.

So what was the final decision? Tune in next time to find out...

Friday, January 23, 2009

Picking Out My Wedding Dress -- Part 4

I'm going on a weekend getaway with Fiance today and didn't want to leave you all in suspense over the wedding dress I picked!


Yes, I know that Option C was actually the more "vintage" of the three, but I didn't have the wedding theme back then, remember? But that bow in the front is DEFINITELY coming off. And the best part of this dress, in my opinion, is the back:


I love corset style backs.

Beautiful Ring Shots

I'm sure you've all seen this lovely picture featured by Mrs. Avocado on weddingbee.
And her source of inspiration from our one heart.
Well, today, I saw a different take on the same photograph, but with a very similar result:

This one taken by Honeysuckle Blossom on bridalbuds.

Must. Have. These. Ringshots!

Wednesday, January 21, 2009

I think I'm in love

After seeing this post on Weddingbee Pro this evening, I was hooked. I spent the rest of the evening surfing BlackSpotBooks esty shop* looking at these beautiful handmade journals covered with old leather and other vintage "trash." From old Ecuadorian sadles to keyholes from the mid 1800s to leather jackets, these journals use all sorts of old, vintage and antique materials. They are absolutely gorgeous and would make a great guestbook for a vintage themed wedding. Unfortunately, they're a bit out of our price range, but perhaps I'll start scouring vintage stores for similar materials and try to make one myself!

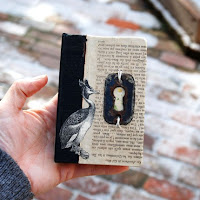
See? Vintage keyhole from the mid 1800s!
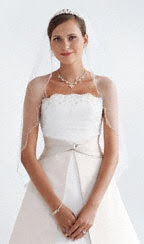
*All pictures courtesy of BlackSpotBooks' etsy shop.

Monday, January 19, 2009

Vintage Inspiration

I know, I know, I've been keeping you all in suspense over which dress I picked. I promise, Part 4 is coming. But for today, I thought I'd share some of the beautiful vintage inspiration boards I've been hoarding in my favorites. If you'll remember, Fiance and I finally decided on a wedding theme almost by accident! Since then, I've been scouring various wedding sites for inspiration!

Here's a collection of my favorite inspiraton boards...and hopefully I'll have my own put together soon!

From snippet and ink, inspired by the pretty little veil in the top right hand corner. Now, who doesn't love the iconic black and white phot in the bottom right hand corner of this board? Must. Have. Wedding Picture. Like. That. I also love the locket, the idea of having a pretty piece of jewelry with something hidden inside. They remind me of the prayer bracelets I used to have as a kid. FMIL has offered to make jewelry for myself and my bridesmaid and floated the idea of lockets. Will have to ruminate more on that...


I loved the wedding dress featured onVintage Glam, by Ashley W. who was applying for a guest blogging spot. So romantic, isn't it? The whole board is a bit rustic for my tastes, but I love it anyway. Sweet, romantic, simple.

Another vintage glam board, this one by Christine. I love love love this board. The key in the bottom right hand corner...I have a thing for old keys. Definitely don't have any way to incorporate it into our wedding, but I love the picture. One of my favorite pics on this board is the second picture in on the bottom. We were already planning on hanging pictures, but I love the old frames and black and white/sepia prints featured here.


This lovely board is from The Bride's Guide. Once again, I was drawn to the old timey pictures. The colors are fantastic, too...I love the beige, champagne and ivory colors. Really gives it the old/vintage feel. And even though I'm not a fan of hats, I love the half-veils that just reach the lips. Mmmm...I definitely want a little birdcage veil for myself. Also, Fiance loves it when girls wear gloves. I told him I'd compromise and wear a pair for our first dance at the reception. I truly love how cohesive this inspiration board is.


And one final board, again from vintage glam, this one by Vanna. I love everything about this board! The music sheet, the hairstyle, the car, candlelight... I also loved the description of this board: "Vanna and her fiance are going for a 1940’s wedding with a vintage Americana twist (think a wedding being held for a WWII soldier and his USO sweetie). They didn’t have a traditional engagement story, and their wedding will follow this trend by throwing a fun fete for their 150 guests." 1930s/1940s are my favorite vintage years.
Interestingly, none of my favorites (i.e. the ones featured above from Vintage Glam) made it onto Vintage Glam's guest blogger list. So sad for me as I was really hoping to see how their weddings turned out as compared with their inspiration boards. But all ten finalists were truly great and I look forward to reading more from them!

Okay, must stop drooling over inspiration boards and get to more pressing matters. Like confirming our ceremony site!

Sunday, January 18, 2009

Always a Bridesmaid, Never a Bride? Not so much...

Despite knowing over a dozen girls -- from high school, sorority days and graduate school -- who have tied the knot in the past few years, I have never been asked to be a bridesmaid. Well, that's not completely accurate as I had one friend who wanted me to be in her bridal party, but her shotgun wedding made it impossible for me to attend. But I've never actually been in a wedding and honestly, that never surprised me.


source


I've always been more of a guy's girl. My five best friends in law school were guys. Heck, my ten closest friends in law school were guys. Despite being in a sorority in college, I kept in touch with more guys than girls after graduation. Same with high school -- with the exception of two or three girls, the only people I talk to on an even semi-regular basis* are boys. Don't get me wrong, I had plenty of girl friends, just rarely anyone I was super close to. They all had closer girlfriends than I, but it never bothered me.

I ended up asking four girls to be in my bridal party because my fiance absolutely could not cut his down to three**, and I wanted the party to be symmetrical because I'm super neurotic. The first three I was able to pick with ease -- my oldest friend (even though we're not super close anymore, there was no way she couldn't be in my wedding), my current best friend that I've known since high school, though we didn't really become close friends until after we both graduated (another guy's girl...perhaps why we get along so well), and my "big sis" from my sorority (who I have always admired and looked up to...it just felt right to honor her). I had some trouble picking the fourth because there simply were no girls that I felt close to in the same way as the other three.

In the end, I ended up going with a girl from law school because I had a friend from elementary, a friend from high school, a friend from college and now a friend from grad school. Remember how I said my ten closest friends in law school were all boys? Well, at least that meant it was easy to pick a girl because I had exactly two girl friends from law school -- one that I stayed in touch with after graduation, and one that I didn't. I don't mean to detract anything from our friendship and don't want to imply that I only picked her because I went to grad school with her. Honestly, there were two other girls I considered for that fourth slot, but I am just as close to them as the girl I actually picked. And, in many respects, she has become a closer friend now simply because I keep in better touch with her through my updates on my wedding and her questions about travel arrangements.

I had also briefly toyed with having my closer guy friends in my bridal party, but I did not want to upset my fiance. I'm sure he would have said it was fine, but there is something a bit inappropriate about asking an ex-boyfriend or a guy your fiance doesn't like or a guy your fiance knows has had a crush on you for years to be in your wedding party, isn't there?

I picked these girls because they mean something to my life. They are girls I admire and respect. Girls who have helped me through hard times, girls that I have called sobbing, girls that I am so honored to have in my wedding. But that doesn't mean I expect to be a part of each of their weddings. Bridesmaid L, yes...I would be quite hurt if she didn't want me to be in her bridal party but I know that our "best friend" street goes two ways. But the others? Not so much, even the one that I have known since elementary school. But there are no hard feelings and I don't believe there should be. I never feel like just because you ask someone to be your bridesmaid you should automatically assume that they will ask you. Otherwise, some girls may end up with 27 bridesmaids like Katherine Heigl's character in 27 Dresses.

So I was pleasantly surprised (okay, I squealed with delight and my fiance gave me a funny look) when recently engaged Bridesmaid B called today and asked if I wanted to be one of her bridesmaids! I had simply assumed that I wasn't in her bridal part and I was fine with that. I was satisfied with an invitation to her wedding. She had been engaged for almost two months and didn't say anything until today when she was out getting fitted for the bridesmaid dress she's wearing to my wedding. I'm so excited to be a bridesmaid!!!


*I'm excluding the facebook "Hey! Happy Birthday!" messages from "semi-regular basis" status.
**In fairness to him, he does have a brother that he had to ask and I do not have any sisters, so I could understand his need to ask three friends and his brother...I would not have been able to make do with asking just two friends!

Saturday, January 17, 2009

Picking Out My Wedding Dress -- Part 3

After vetoing certain styles in Part 1 and adding others to my "favorites" list Part 2, it was time to venture to the actual store.

Bridesmaid L and I were greeted with bright flourescent lights, and massive amounts of racks; bridesmaids dresses on the left, wedding dresses on the right and shoes/accessories in the back. We stood by the desk by the front, thumbing through their catalogs as we waited for someone to assist us. "Do you have an appointment?" one of the sales associates asked when she noticed us. I nodded and she told me to start looking for dresses I liked while she found the consultant assigned to me.

I headed to the racks with Bridesmaid L, beginning in their woefully tiny size 0 section. There were exactly two dresses there -- one baby blue princess-y monstrosity (which looked remarkably like my ballet recital costume from 3rd grade...and even though I was going for something with a splash of color, I still wanted some semblance of a white dress!) and another that was simply too ornate for my tastes (think metallic embroidery and beading).

We found a couple of dresses on my list in the size 2 and size 4 section as well as a few others that I either didn't see online or looked way better in person. Our bridal consultant found us browsing through more gowns and led us to the dressing room. On the way Bridesmaid L spotted a gorgeous dress on the manequin and we asked our consultant to add that one to the pile as well.

The consultant stuck me in the room and handed me the most amazing strapless bra ever -- seriously, after a couple hours of wearing it, dressing and undressing, the thing stayed up the entire time -- and a poofy looking slip while Bridesmaid L sat in an adjacent chair, flipping through the wedding dress catalog.

We took lots of pictures, laughing about the truly hideous ones whenever the consultant left us to help her other customers or went looking for more dresses. I didn't actually end up trying all the ones in my initial pile because once our consultant got a sense of what I was looking for, she hunted down dresses she thought would fit my style. Unfortunately, many of those were on my "no" list and I didn't like them on me any better than I did in online. I tried to be diplomatic "I just don't think it's my style. It's a very pretty dress, though" but in retrospect, it might have been better to be firm. Then, I wouldn't have ended up trying on so many that I didn't like.

By the end of it all -- 15 dresses (including three from my "favorites" list and three from my "no" list) and 3 veils later -- I was tired of changing in and out of dresses and honestly couldn't stand to look at another one. I'm the type of girl who hates trying on clothes. Whenever I go to the store, I can fairly accurately guess whether something will fit and look good on me. I've mastered this talent when it comes to jeans, skirts, sweaters and tops. I still have some trouble with dresses and dress shirts, though. But I digress. As I was saying, I have very little patience for trying clothes on. Especially when, after I make an immediate assesment that I don't like it, I have to wait in the dress for 10 or 15 minutes because my consultant has run off again.* In the end I loved the first two dresses I tried on and the very last one. The first two were on my "favorites" list while the last one was dress Bridesmaid L spotted on the manequin. Ready to see which ones they were? Anyone want to go back to Part 2 of this saga and make guesses as to which two made my final list?


Yup! Option #5, the one that I said was probably my favorite ended up being the first dress I tried on and I loved it! It was very simple in the front and I loved the two tone split/cutaway in the front. The champagne color was gorgeous, the simple a-line has always been my favorite for skirts (though I didnt know the proper term for the style) and the beading on the train and very top of the dress was enough to give it something extra while still remaining somewhat simple. Bridesmaid L loved it too! We shall now rename this choice "Option A" for ease of description in Part 4 (forthcoming).


Option #4 was the second dress I tried on and it also made my top three! I hated the bow on the front, but the bridal consultant showed me how it was tacked on and assured me that it could be removed. This bride is definitely anti-bow. It was a lot more ornate than I wanted, but was something I could deal with. I also adored the back of the dress which was a lace-up/corset style which gave me a fantastic figure. The skirt, a trumpet style, looked great on me and I was surprised to find out that I did like trumpet and mermaid gowns. At this point I was afraid that I was going to fall in love with every dress I tried on, but luckily it didn't turn out that way. When I didn't like something, I knew immediately. While there were plenty of other dresses that I did like, they just didn't make my final cut. Bridesmaid L also agreed that this dress, Option B, was just as good as Option A.


Finally, the last dress. This one I had to try on in a size 14 because it was the smallest one they had in the store. Seriously? Me in a size 14? The consultant tried her very best to pull the dress back after I was in it to show me what it would look like on me when I got it in the proper size and had it tailored. She also showed me the view from the back which, minus the huge bow, I loved. I have to hand it to her, for something that I was swimming in when I first put it on, she made look really great. This one had no additional beading or embroidery, but I loved the rouching (is that what it's called?) and the twisted fabric around the shoulders and back. Option C definitely made the cut too. It was a nice way to start and end the day -- my first two dresses and my last one making the final list.

I have to say, that it was sometimes very hard to determine what would look good on me since all the dresses I tried on were massive on me -- I did not end up trying on anything in my actual size and most that I did try on were 4 or 5 sizes too big. They were pinned with clothespins and binder clips in so many places that sometimes all you could see were a row of clamps! Overall, the consultant did a great job and I asked her to write down the above three styles so I could bring my mom back with me to make the final decision.


*I liked my consultant, I really did...and I understand she was super busy. It's just that trying clothes on is not my cup of tea so doing it for so long, and doing anything that extended this period was hard for me. I also felt super bad for Bridesmaid L who had the patience of a saint.

Friday, January 16, 2009

Picking Out My Wedding Dress -- Part 2

In Part 1 of my dress-shopping saga, I learned about the styles I didn't like. To recap: no pickups, no tulle, no full skirted gowns, not too much embellishment. It was time to start figuring out what I did like. I was thinking something simple and classy, perhaps in an ivory or something with a splash of color. Had I picked our vintage theme before wedding shopping, I'm sure my dress would have been much different.*

Dresses I liked:


Okay, to be honest, I didn't really love this dress, but it was one of the only tea-length dresses I could find on the David's Bridal website. Since, at the time, my fiance and I were strongly considering a beach weding (and by strongly, I mean 90% of sites we researched would involve at least a beach ceremony . . . and possibly a beach reception, too), a shorter dress seemed like a necessity. I was pretty disappointed with DB's tea-length dress selections, though. So this was option 1.


This dress, option #2, was one of my favorites. It looks even better when you click on the actual dress link and zoom in to see the details. I loved that from far away it looked so simple, but up close there was some embellishment. Plus, I loved the
burnout** style (I have clothes in my closet like this). Unfortunately, I knew almost immediately that my fiance wasn't going to be crazy about this dress. He had made it pretty clear that he really wanted me to wear something that looked like a wedding dress and not just "some white dress."


Here was option #3. You can see that I really was going for the simple look. The picture shows it in pure white, but according to the dress details, it's also offered in ivory.


I wasn't crazy about this one, but I saved it to my favorites anyway. It doesn't hurt to keep your options open, right? I hated the bow on the front, but liked the rest of the dress. There was embellishment on the bodice only which I thought would be a fair compromise between the completely simple look I wanted and the whole "looking like a wedding dress" that my fiance wanted. I also started realizing that I really love the strapless look. My only concern was that the dress would fall down since I've had similar problems with other strapless dresses and tube tops I own. This bride is, shall we say, teeny-tiny in practically every way? No boobs to hold the dress up . . .


On to option #5. Again, a strapless dress. I loved the two-tone of this dress! And it wasn't too white...I loved the champagne color and the cut of the dress. It was, overall, very simple but also elegant and different. I kept going back to this one during my online dress search and decided that it was my favorite of the ones I'd seen.

Option #6 was probably my second favorite! I loved the sash in the front that goes all the way to the floor in the back. I wasn't crazy about the red, but it turns out you can make the sash any color you want. I was envisioning champagne or pewter grey. I'm usually not crazy about halters because I don't think I was blessed enough up top to pull it off. But, I still loved the dress. You can see that I was also falling in love with the split-front/cut-out style.


This one was kind of similar to option #3, above. I loved the bodice of the dress and liked that it had some embellishment on the top, but was very simple on the bottom. I thought it would show off my figure nicely, too. And, like many of the dresses I liked, it was strapless. Nothing in particular stood out to me for option #7, but I liked it all the same.


Finally, we have option #8. You can't see it from this picture, but there is no train on this dress which really appealed to me. It was a very simple, strapless dress that had kind of an asymetrical skirt. It's hard for me to really explain with my limited fashion knowledge, but if you click here you'll see what I mean. My only concern with this dress was that, although I loved its simplicity, my fiance (and mom, for that matter) would think it was too plain for a wedding dress.
When I went to DB, I tried on a lot of the above dresses, but not all. I also ended up trying on some that were on my "no" list (mainly because the consultant brought them over and I didn't want to be rude/hurt her feelings...yes, I'm slightly neurotic when it comes to pleasing people). And I found some others in the store that were very pretty...ones that I either did not see while browsing online or just looked a lot better in person. But we'll save that for Part 3.

Any guesses as to which dress I ended up choosing? Is it one of the ones above? One of the dresses on the "no" list from Part 1? Something completely different? Of course, you know that (at least in my opinion) my dress kind of (but not totally) fits in with a semi-vintage themed wedding...do any of these dresses have that feel to you? Stay tuned to find out!


*I do think that my dress still kind of fits into a vintage-y feel, but I've seen so many other dresses since picking our theme that I love. I still love the dress I ended up picked, though, so I'm not too disappointed that we didn't pick the vintage thing sooner.
**See, I was still expanding my fashion terminology knowledge!

Wednesday, January 14, 2009

Picking out my wedding dress -- Part 1

Despite the terrible reviews David's Bridal gets in just about every forum I've looked at (including yelp, bridal bargains, google reviews, etc...) I decided to take my chances. DB was the first place I went dress shopping and found my dress almost immediately. I did visit one other bridal shop, but did not find anything within my budget (and, quite honestly, didn't really find anything I even liked there).

About a week after my fiance and I got engaged, one of my best friends and I spent a morning at DB to try on dresses! I called to make an appointment and the girl on the phone told me to print out my favorite styles from their website to try on. Unfortunately, I honesty had no idea what I wanted. No clue at all. I've never been the type of girl who has spent her life dreaming about her wedding, sneaking peeks through wedding magazines or sketching her wedding dress in the margins of her class notes. And there are so many styles and choices out there! What's a girl to do?


To make matters worse, I am by no means a fashionista. I buy things that I think look good on me, but I have no idea what "a-line" means! So when friends started throwing words out like "trumpet" or "mermaid" or "bias cut" or "corset" (okay, that one I knew) I panicked a little. "How will I ever find a dress if I don't even know what I'm looking for? And I can't use the right terminology to explain what I like and don't like?" I wondered.

Now, I'm an indecisive sort and it's always hard to pick any one thing whether it's a movie to watch, a book to buy, or what to eat for lunch. So I went through my typical route and started eliminating styles that I didn't like. And I slowly learned some fashion terms.

Styles I vetoed (all images courtesy of DB):


I didn't like the skirt on this dress...also known as a "pick up." I did end up trying on a couple with this style, but only because the consultant kept bringing them over to me and I didn't want to be rude. I think I live for other people's approval...even the bridal consultants who work on commission.


I also didn't want anything too "princess-y." No full ball gown type skirts, no feathers, and no tulle. Now, this decision was made partly because I'm not real into the princess look...it's just not my style. I did once buy a prom dress with a big full skirt, but I was 16...and even then, it wasn't really my style (but I was still figuring all that out). The other reason? I'm super tiny! I'd just get way too lost in a big poofy skirt.


I realized fairly quickly that I didn't want anything that had too much embellishment, at least embellishment that was super obvious. So, nothing that was overly beaded, lace or sequined. No surprises here, since all of my clothes are generally very simple and classic looking.


These three got three big "no!" responses from me. Just too over the top and detailed for my liking. (Especially the first two which featured the aforementioned "pickup" style skirt.) Initially, I also thought that I didn't want a white dress. I just felt that stark white wasn't a good color on me. So I was leaning more towards ivory and champagne. I felt like I wanted some color on the dress, too, and was strongly considering a sash. I wasn't too sure about the train, but was leaning against it. Most wedding dresses have trains, though, so I knew I'd probably have to at least try on dresses with the train.

So, after my initial narrowing down of styles, my summary: No "pick-ups," no tulle, no full ball gowns, little to no embellishment, and something off-white. After eliminating these styles, it was time to start looking into things that I did like. But we'll save that for Part 2!

Monday, January 12, 2009

Pocketfold Cost Breakdown

This weekend, my friends and I made pocketfold invitations. I thought I got it done in under $30, but it turns out that it was closer to $40, mainly because of the stupid paper scorer that I bought (otherwise it would've been just over $30). Not bad, though, considering if I'd purchased them online, it would've been upwards of $80.


Anyway, here's the cost breakdown:

3 packages the "value pack" cardstock. Each pack had 50 sheets of paper, but I only liked three of the colors (about 30 sheets) so we needed 3 packages to get the 75 sheets needed. $9.50 (One was 50% off when I bought it and the other two were 25% off). I do plan on using the remaining sheets (i.e. the colors we didn't use) for the cards that are going inside the pocketfolds, like our RSVP cards and directions, so they're not going to waste!

Corner rounder by Fiskars $7.20 (used a 40% off coupon)

Stamp $5.40 (again, used a 40% off coupon)

Stamp pad $5.40 (used a 40% off coupon)

Paper scorer that didn't really work $8.40 (used a 40% off coupon)

Two boxes of zips $5.00 (used 50% off coupons on them)

Total cost: $40.90
Not bad, yes? The cost should've been $8 less...or at least $5 less if I'd found the bone folder I'd originally been looking for. I also have half a roll of zips left and a corner rounder that I'm planning on using for other projects. (See how I like to justify costs to myself?)

Sunday, January 11, 2009

Weekend of wedding crafts (with tutorial)

The invitations are almost done! Well, they will be once we actually get all the details (times, etc...) locked down. But the hard part (at least I hope it was the hard part) is done! Three of my girlfriends got together with me this weekend and we had a wedding crafting party.

We watched wedding movies (including Wedding Crashers, Sex and the City and 27 Dresses before getting chick-flicked out and switching to The Tudors) while putting together 75 pocketfolds . . . and for under $30 as long as you don't count the guillotine paper cutter that I purchased (but will use for other projects as well).
I found inspiration for pocketfolds just about everywhere. Ultimately, I had Bridesmaid C design them and she used these instructions by Mrs. Daffodil as guidance. I knew I wanted rectangular invites, though, since square envelopes (for whatever random reason) cost more to mail.

Supplies:
1 sheet of 8.5" x 11" cardstock per pocketfold
1 paper cutter (I highly recommend a guillotine)
1 paper scorer/bone folder (or if you don't have one, use the edge of scissors like I did . . . but it was REALLY hard)
1 stamp of your choice (optional)
1 stamp pad (optional)
1 corner rounder (optional; after reading weddingbee religiously, I made sure to find the kind where you use your whole hand instead of just the thumb punch)
2 boxes of zips (make sure it's high adhesive!)
3 dedicated friends

Steps:
1) Cut the paper into proper dimensions. Make one cut so that you have a 5.5" x 11" sheet. Using the remaining piece of scrap (the 3" x 11" side) make a 5.75" cut. And that other scrap you have? the 5.25" x 3" piece? We found it fits nicely into the pocketfold and can be a little reception card. Waste not, want not . . .


2) Using the 5.75" strip, score the paper .25" from the edge on the bottom and right edge. Cut the strip diagonally from one corner of the scoring to the other (see diagram; cut from point A to point B). Cut triangles on outside of score line to make sure that there isn't a flap sticking out when you fold the score lines up (again, see diagram.) Note that you're cutting the part that will be folded, not the triangle itself! Fold the scored lines and trim as necessary.


3) Now that big piece you have? The 5.5" x 11" sheet? Make two score lines, one 4" from the bottom, the second line 8" from the bottom. Thus, you should end up with three sections: one 3" section on top, a 4" section in the middle and 4" section on the bottom. Fold the scored lines. I used a corner rounder for the top section so that when it folds over it looks a little less harsh, but that's completely optional.

So, the bottom third will be the part with the pocket and will hold our RSVP card, directions and reception card. The middle third will be the ceremony info (we're going to print it out on beige or cream colored paper then glue it into the middle).

4) Go back to your triangle and place a zips strip on the .25" strip that's been folded up. Try not to touch the zips! The beauty of zips is that you can cut the strip to the length desired, press it onto your paper then peel off the backing. That way you don't have to touch this super sticky tape and it will adhere better. Now stick it onto the bottom edge of your big piece. Press it down firmly, otherwise it's not going to stick. For good measure, stick them between heavy books. I found that this project made excellent use of my now retired law school casebooks. Pictured below, in order of size: Constitutional Law, Trade Regulation (a.k.a. Antitrust), Immigration (okay, this one is my fiance's but I figured he wouldn't mind), and Contracts.


5) Prettify your invitation however you choose. Or don't because it looks pretty the way it is. I found a pretty little scrolly/flowery stamp and used it on the front outside of the pocketfold. Be very careful if you use the brilliance ink pad made by tsukineko. Even though it says fast drying, it took a good few hours to fully dry. Thus, a few of ours ended up smudged, but I wasn't really going for perfection and I like the handmade look they have. Do NOT stack the pocketfolds on top of each other while they dry if you stamp them. You will end up with silver ink (or whatever color you choose to use) on the back of each invitation. After they dry, you may want to stack them up and stick them under law books (or telephone books or other heavy items) overnight to make sure those pockets really stay down.

We're not entirely sure yet how to close the invite. Bridesmaid C (and designer/engineer of these pocketfolds) really wants a wide ribbon to tie it all together. Originaly, I was opting for a thin ribbon. Now that I think about it, and given our theme, I'm starting to look into wax seals, maybe with our monogram. I think it would look really awesome, but am a little concerned with the cost.

Anyway, that's what I did this weekend! I'm super excited about how well it all turned out and how much we accomplished. Bridesmaid C was the first to show up around 10 a.m. followed by Bridesmaid L at around 11 and then Friend D at about 1. By 5 p.m. or so we were completely done and Bridesmaid L even got a start on monogram letters. Having three friends really made everything so much more efficient and was a lot of fun! We had a paper cutter, a paper scorerer, paper folder and pocket gluer. Before I knew it we had 75 pocketfolds nestled between a stack of law books. Great job ladies! Thank you for all your help!